

Solar Hardware for Self-Installation in South Africa by Roof Type
You can size a solar system yourself before requesting a quote, but treat your calculation as a starting point, not a final equipment specification. Base it on household energy use, the loads you need to run at the same time, and the roof space available for panels. Choosing solar hardware for self-installation in South Africa also means matching the panels, inverter, batteries and roof-mounting system.
Work through these requirements first: an undersized system may not support essential loads, and incompatible mounting hardware can complicate installation. This guide explains how to estimate system size, assess roof and panel compatibility, compare mounting options for common roof types, and plan a safer installation. It also highlights the details that affect equipment choices, helping you prepare a practical specification before buying.
Key Takeaways
- Match mounting hardware to your roof profile, fixing points and exposure to wind before choosing a kit.
- Compare panel dimensions and frame thickness with rail layout and clamp positions to confirm compatibility.
- Build your equipment plan around household loads, then align panels, inverter, batteries and mounting components.
- Use your system size and roof requirements to narrow down suitable hardware, including a hybrid inverter and battery package where appropriate.
Mounting options for IBR, corrugated and Klip-On roofs
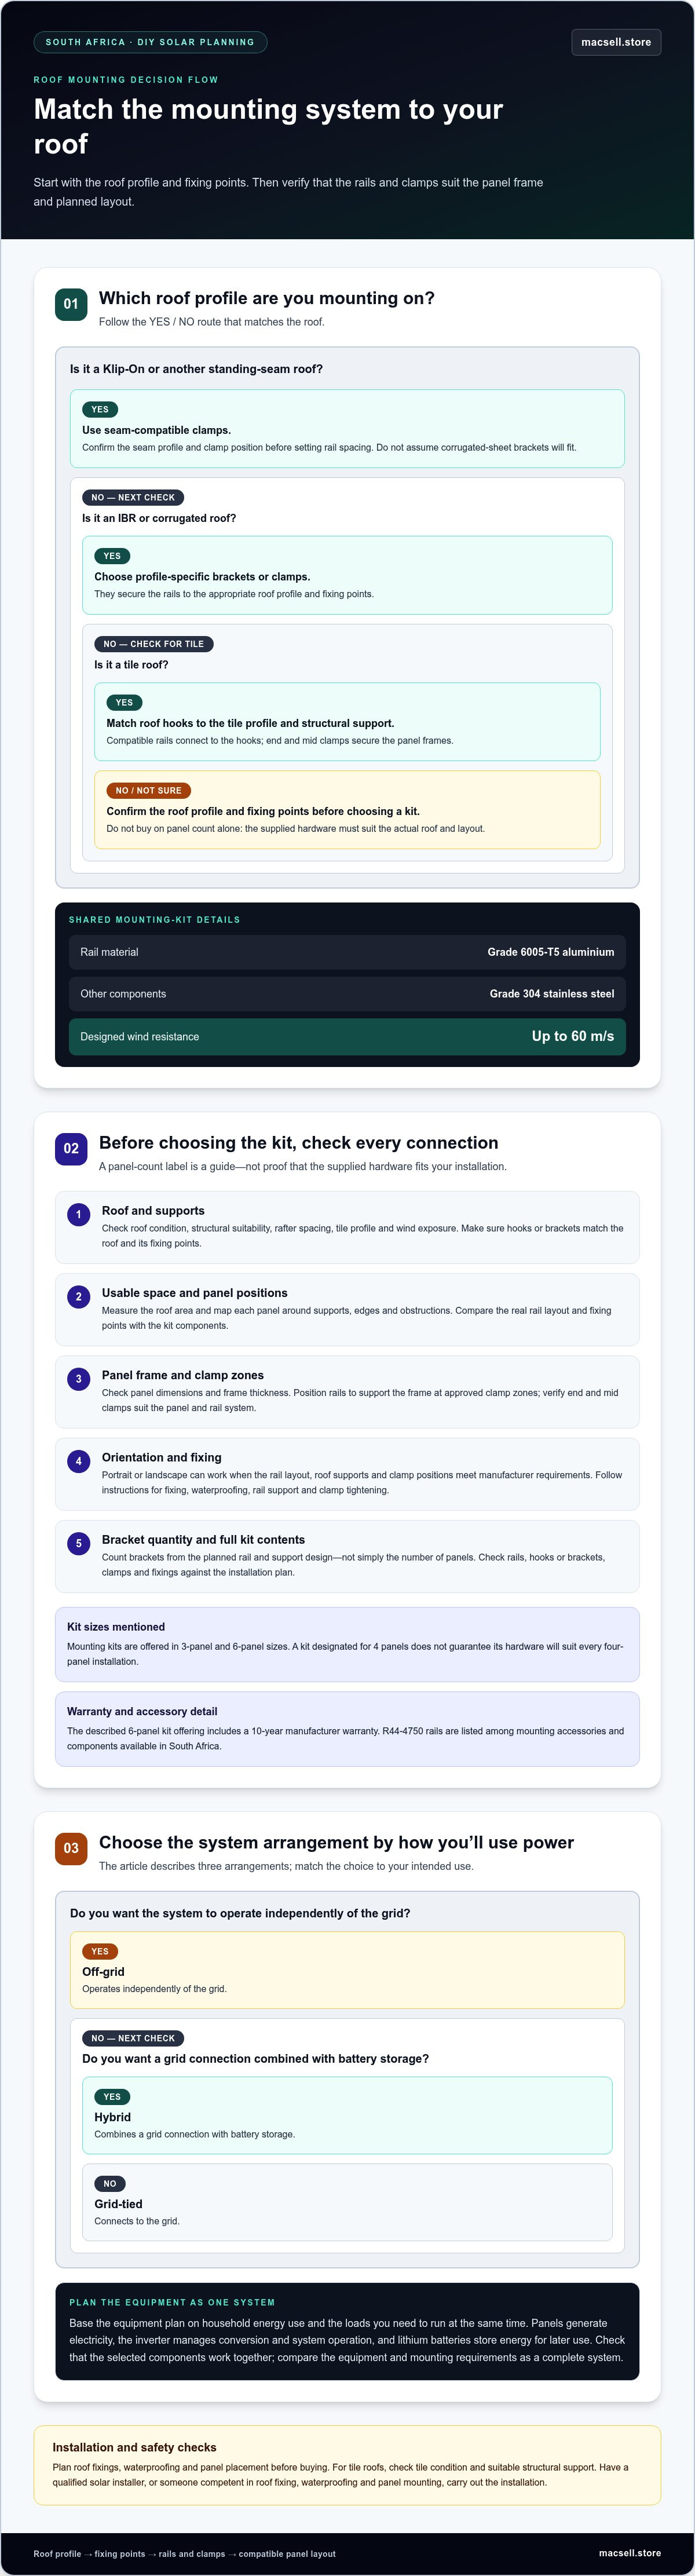
Choose mounting hardware to match the roof profile and its fixing points. IBR and corrugated roofs use profile-specific brackets or clamps, which secure rails without relying on the wrong sheet area. Klip-On roofs need compatible clamps that engage the standing seams. The mounting kits described for South African roofs use Grade 6005-T5 aluminium rails and Grade 304 stainless steel components. They are designed for wind resistance up to 60 m/s.
Off-grid systems operate independently of the grid, grid-tied systems connect to it, and hybrid systems combine a grid connection with battery storage. The right arrangement depends on whether you need backup during outages, want to operate independently, or plan to generate power while connected to the grid. Equipment costs depend on panel quantity and capacity, inverter selection, battery storage and roof-mounting requirements. Compare components as a complete system rather than treating the panel price as the total.
For a tile roof, match each roof hook to the tile profile and a suitable structural support. Compatible rails connect to the hooks, while end and mid clamps secure the panel frames. A mounting kit may include hooks, rails, clamps and fixings, but the components must suit the roof and panel layout. Check tile condition, rafter spacing, frame thickness and rail support before installation. Follow the mounting-system instructions for waterproofing, fixing and clamp tightening.
KlipLok and other standing-seam roofs need seam-compatible clamps. Do not assume brackets made for corrugated sheets will fit. Confirm the seam profile and clamp position before setting rail spacing. Product supply and turnkey EPC installation have different scopes: EPC covers engineering, procurement and construction, while purchasing hardware does not include that wider project scope. For self-installation, plan roof fixings, waterproofing and panel placement before buying components. Have a qualified solar installer or someone competent in roof fixing, waterproofing and panel mounting carry out the installation.
Roof, panel and hardware compatibility checks
Match the mounting kit to the roof structure, panel frame and planned array. Check every connection between components before choosing the hardware.
Kit sizing and panel layout
Mounting kits are offered in 3-panel sizes, but panel count alone doesn’t settle compatibility. Measure usable roof space and map each panel position against supports, edges and obstructions. A kit designated for 4 panels doesn’t guarantee its supplied hardware will suit every four-panel installation. Compare the kit components with the actual rail layout and fixing points. Check roof condition, structural suitability, rafter spacing, tile profile and wind exposure before purchase.
Panel orientation and rail layout
Portrait or landscape installation can work if the rail layout, roof supports and clamp positions meet the panel and mounting-system manufacturers’ requirements. Check panel dimensions and frame thickness, then position the rails to support the frame at approved clamp zones. On tile roofs, hooks attach to suitable structural supports, and compatible rails connect to those hooks. End and mid clamps secure the panel frames to the rails. Follow the manufacturers’ instructions for fixing, waterproofing, rail support, clamp positioning and tightening.
Bracket quantity follows the actual support and rail design, not simply the number of panels. Therefore, a per-panel bracket price depends on the roof profile, required fixing points and compatible components. Count the brackets from the planned layout before comparing kit totals. A three-panel array, for example, may need a different rail and fixing arrangement from a four-panel array. Use panel dimensions and frame details to assess suitable solar panels alongside mounting compatibility.
DIY-friendly kit contents
A complete solar system brings together generation, conversion, storage and roof-fixing components. Compare electrical equipment separately from mounting hardware, then confirm that the selected parts work together.
Panels, inverter and batteries
Solar panels generate electricity, while a hybrid inverter manages conversion and system operation. Lithium batteries store energy for later use. Choose compatible equipment based on the loads you need to run and your planned system design. If you want stored power, for example, the batteries must suit the inverter and intended use. Compare panel, inverter and battery specifications together rather than selecting each component in isolation.
DIY mounting hardware
Mounting components secure panels to the roof and support the chosen layout. A typical arrangement uses roof-specific hooks or brackets, rails, end clamps, mid clamps and fixings. R44-4750 rails are listed among solar mounting accessories and components available in South Africa. Check the rail profile, bracket type and clamp fit against the roof and panel frame. A mounting kit’s panel count is a guide, not proof that every installation has sufficient hardware.
Use this component check before ordering:
- Confirm the panel count and dimensions against the rail layout.
- Match brackets or hooks to the roof profile and fixing points.
- Check that clamps suit the panel frame and rail system.
- Compare the inverter and battery specifications with the system design.
Mounting kits are available in 6-panel sizes and include a 10-year manufacturer warranty. Those details describe the kit offering, but the roof layout still determines which components are needed. Check the supplied hardware against the installation plan, including rails, fixings and clamps. If you’re selecting panels alongside the rest of the equipment, compare solar panels with your planned system and mounting arrangement.
What solar panels, inverter, batteries and mounting hardware are needed for a DIY solar system in South Africa?
A DIY system needs panels, an inverter, optional battery storage and roof-compatible mounting hardware. Choose them as one system, based on household loads, roof space and intended use.
Start by listing the loads you want to power. Solar panels generate electricity, the inverter converts and manages power, and battery storage holds energy for later use. Panel capacity and battery configuration depend on your energy needs and available roof area. Note essential appliances and when you use them before comparing equipment. This gives your system design a practical starting point.
Choose an inverter type that suits how the system will operate. A hybrid inverter can work with solar panels and batteries, so it may suit a plan that includes stored energy. Match the inverter to the panels and battery using the manufacturers’ specifications. Lithium batteries are one option for storage. Don’t choose an inverter by its nameplate capacity alone: consider its role alongside the loads and the overall system design.
Mounting hardware must suit both the roof and panel frames. A typical arrangement includes roof brackets or hooks, rails, end clamps, mid clamps and fixings. R44‑4750 rails are listed among solar mounting accessories available in South Africa. Mounting kits are available in 6-panel sizes, and the described kits include a 10-year manufacturer warranty. Confirm that the supplied parts match the planned panel layout and roof structure.
Before purchasing, compare equipment specifications and installation instructions. Check panel dimensions, inverter compatibility, battery requirements and mounting components together in one equipment schedule. This helps reveal mismatches before components reach the roof. Keep product instructions together for installation and later reference. Plan roof fixing, waterproofing and electrical connections carefully.
Ready to assemble your equipment list? Explore solar panels, hybrid inverters and lithium batteries for your planned system.
MacSell Solar Outlet: Sunsynk 8KVA & 2X Hubble AM2 5.5 KWh Combo Kit
MacSell Solar Outlet offers the Sunsynk 8KVA & 2X Hubble AM2 5.5 KWh Combo Kit for readers considering a hybrid inverter and battery package. It may suit a system plan that includes stored energy, subject to your load requirements and equipment compatibility.
MacSell Solar Outlet sells lithium batteries, hybrid inverters and solar panels as separate hardware categories, as well as pre-configured combo kits. Use your system design to decide whether a kit or individual components better suit your planned setup. Before purchasing, compare each component with your panel arrangement, battery requirements and intended system operation.
Once you’ve established your equipment requirements, MacSell Solar Outlet is a practical next step for sourcing solar hardware. Visit macsell.store to explore available panels, hybrid inverters, lithium batteries and combo kits.
Turn your system plan into a purchase-ready specification
Before ordering solar hardware for self-installation in South Africa, turn your draft equipment list into a clear procurement schedule. Record each selected component’s model, intended position and required quantity. Keep the manufacturer instructions with the schedule so you can compare the delivered parts with your design before work begins.
Keep changes controlled. If you need to replace a component, review its compatibility with the rest of the planned system rather than treating it as an isolated swap. This helps keep purchasing decisions aligned with your design and makes the next stage easier to organise.
Once your specification is ready, MacSell Solar Outlet is a practical place to source solar hardware for your project. Contact MacSell Solar Outlet to take the next step with your equipment plans. A prepared specification gives you a clearer starting point for moving forward.
Frequently Asked Questions
Can I size a solar system myself before requesting a quote?
Yes. You can prepare a useful preliminary system estimate by listing appliances, their rated power and how long you expect to use each. Separate essential loads from occasional high-demand appliances, then note which may run simultaneously. This helps you estimate inverter capacity and storage needs. Treat the result as a planning estimate, not a final electrical design.
Which South African suppliers sell solar hardware for self-installation?
MacSell Solar Outlet sells solar hardware in South Africa, including panels, hybrid inverters and lithium batteries. Its range includes the Sunsynk 8KVA & 2X Hubble AM2 5.5 KWh Combo Kit. Compare product specifications with your planned system and roof requirements before selecting equipment. This helps you distinguish a suitable combination from a set of components that may not work together.
What solar inverter and battery brands are reliable and compatible in South Africa?
MacSell Solar Outlet sells Sunsynk, Deye and LuxPower inverter products, alongside Hubble lithium batteries. A familiar brand name alone does not establish compatibility. Compare the specific inverter and battery models’ voltage, charge and discharge limits, and communication requirements. For example, confirm that the battery’s operating range suits the inverter’s battery input. Use the manufacturers’ compatibility information to assess a pairing rather than assuming the products will automatically work together.
How do I size a solar system for my household electricity usage?
Start with recent electricity bills to understand overall consumption, then list appliances that need backup. Use each appliance’s rated power and expected operating time to estimate energy demand. Add up the essential loads and identify which may operate together, since simultaneous demand affects inverter selection. Battery capacity depends on how long you want those loads supplied without solar generation. Available roof space also limits the panel array.
What are South Africa's rules for installing solar panels and connecting to the grid?
Requirements depend on the system and the electricity distributor serving the property. Grid-connected equipment may involve connection approval or registration, while an off-grid system has no grid connection to arrange. Before installation, account for local connection requirements, inverter suitability and electrical safety documentation. The distinction matters: a system that supplies a home independently has a different connection relationship from one operating in parallel with the grid.
Does a DIY solar installation need an electrician's Certificate of Compliance in South Africa?
Whether a Certificate of Compliance is required depends on the electrical work and applicable South African requirements. Calling a system DIY does not determine the answer. Work affecting fixed wiring or connecting equipment to a property’s electrical installation needs careful assessment. Have a suitably qualified electrical professional review the scope and documentation requirements before energising the system, and retain equipment details and installation records for future maintenance.